Attendee Approval
Video Guide
- To view a video recording on this feature, please refer to this video.
Article Guide
The Attendee Approval feature is only available for in-person events. Organizers will be able to see the Attendee Approval feature toggle under General Settings on the backend portal.
The Attendee Approval applies to both ticket types.
- Paid Ticket
- Free Ticket
If you reject a Paid Ticket, you will need to handle refund on your side. Clicking reject button on EventX, won't auto refund the paid attendee.
How organisers can view the registration inside the portal?
After a registration is received, our platform will capture the waitlisted attendees and hold their registrations for organizers to review. Organizers can then selectively approve or reject waitlist attendees based on criteria like seniority, company size, or other attributes that impact potential value. The approval process will boost event impact and budget efficiency.
How organisers can approve/ reject registrations?
Method 1: Single Approval
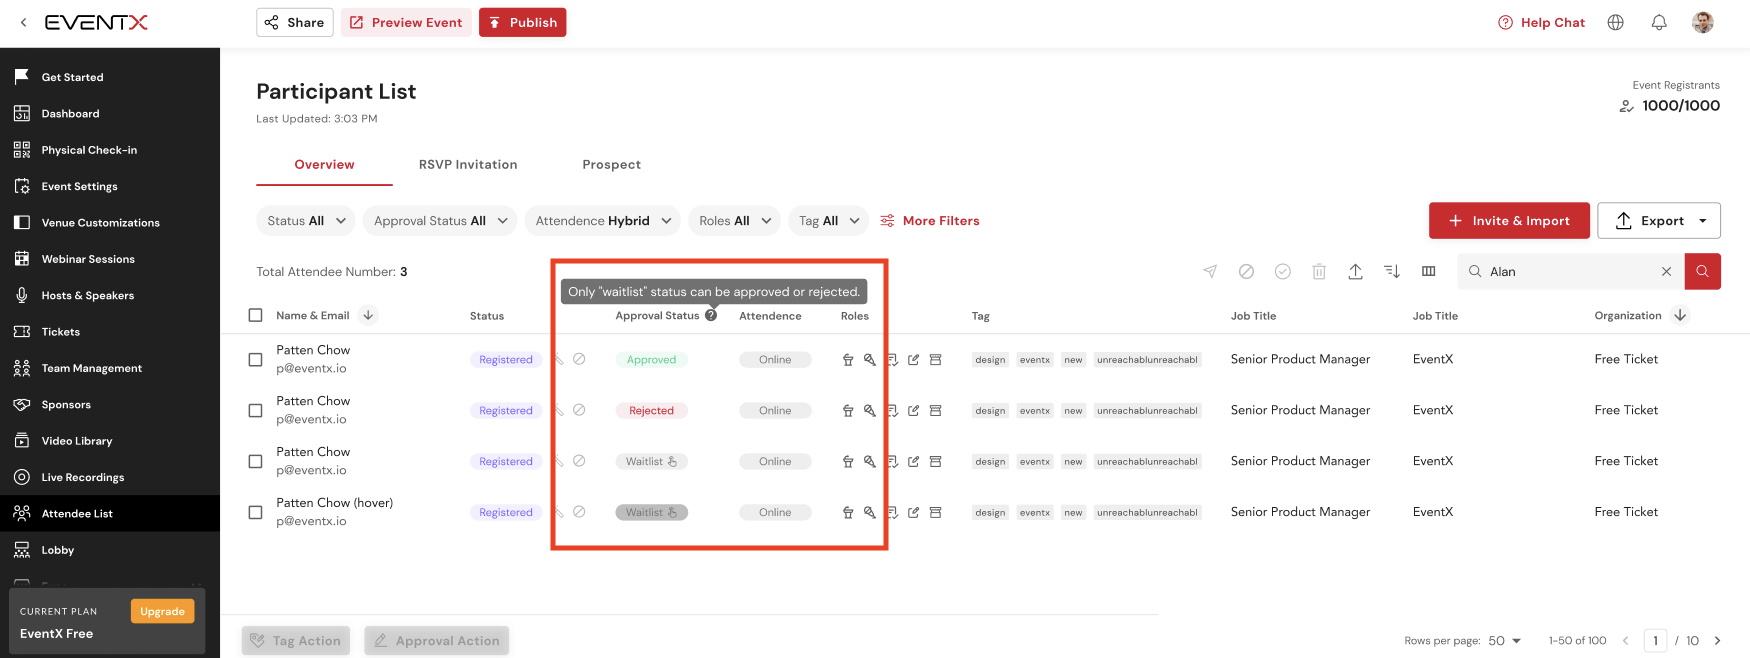
Step 1. Select "waitlisted" attendees
Step 2. Click "approve" or "reject"
Step 3. Confirm
Step 2. Click "approve" or "reject"
Step 3. Confirm

Method 2: Bulk Approval
Step 1. Filter "waitlisted" attendees according to status, and select all
Step 2. Click "Approval Action"
Step 2. Click "Approval Action"
Step 3. Click "approve" or "reject"
Step 4. Confirm
Step 4. Confirm

Attendee flow after registration
- Fill in registration form
- Receive acknowledgement email after successful registration
- Acknowledgement email template is as below:
- Receive confirmation via email after being approved by organiser. If WhatsApp and/or SMS features are toggled ON for the event, the confirmation and reminder messages will be sent to the approved attendees.
- Confirmation Email
- WhatsApp confirmation message template sample (uneditable)
- WhatsApp reminder message template sample (uneditable)Note: The 1 hour and 24 hour reminder message share the same template
- If your registration has been rejected by the organizer, the organizer will need to send you an email manually to notify you about the rejection. There are no automated emails to notify attendees who have been rejected.
How to edit the acknowledgement email template?
1. Go to "Email" > Select "Automated Email" > Select "Acknowledgement Email" under the list of templates.
2. Click the edit icon to be directed to the email template.
Remarks/ Limitation:
- Only applies to in-person event, NOT applicable with virtual event/hybrid event.
- Once this feature is enabled, it will apply to all registrations (except "add attendee to event")
- Only registered and waitlisted status attendees can be approved or rejected. You are unable to approve an attendee under Invited status.
- Confirmation email will be automatically triggered after organiser approves an attendee. If WhatsApp and/or SMS communication methods are toggled on, the approved attendees will also receive the confirmation and reminder messages via the respective methods.
- Organiser will need to send the reject email using the manual email flow once they have rejected a registrant.
Related Articles
Adding an individual attendee record
Bulk importing helps when you need to upload a high volume of new records all at once. However, we also understand that event organisers might want to import single attendee records one-by-one in certain situations. Please follow the steps below to ...Attendee Removal Feature
Organizers can remove attendees under both “Invited” and “Registered” Status. You can now easily manage your registrant data directly within the platform by exporting, editing, and re-importing the attendee lists. Note: Attendees under "Attended" ...Exporting Attendee List Report
To keep a record of all the participants who attended your event, you can now export the attendee list report anytime from the Organizer portal. This feature is available on our Enterprise plan. To export the attendee list report: Step 1: Log in to ...Attendee status on People List
As part of our efforts to improve the user experience on EventX, the attendee status on the People List now has 3 distinct categories including Registration Status, In-person Attendance and Virtual Attendance. Registration Status To ensure more ...Registrant Attendee Quota/ Pax Calculation
The Registrant Quota refers to the number of registrants you have subscribed to with EventX in your subscription plan. Event Level Breakdown In the attendee list, there are a number of figures that give us different information. The definitions of ...