Zebra Printer Setup Guide
- Plug in your SIM router. Plug in the power cord to the router and turn the router on by pressing and holding the power button.
- Set up your iPad. Turn on the iPad and follow the initial setup process.
- Connect your iPad to your router's wireless network. Tap the Settings icon from the iPad's home screen. Connect your iPad to your router's wireless network. The name and password will be printed on a label on the router.
- NOTE: If you connect to any other network, your iPad and printer won't be able to link to each other, and you won't be able to print badges.
- NOTE: Confirm that you have a live internet connection by opening the Safari browser on your device and visiting a webpage.
- Download the EventX Check-in app. Open the App Store on your iPad and download the EventX Check-in app. Related article
- Plug in your printer. Plug in the power cord to the printer and turn the printer on by pressing and holding the power button on the top of the printer until the indicators illuminate.
Plug one end of the included Ethernet cable into one of the four LAN ports on the back of the router, and the other end into your printer.

- Open the printer. Open the printer by pulling the side release latches towards you, then lift the printer cover up.

Adjust the media sensor. Push the yellow sensor center to the left of the printer. The sensor is used to detect the black mark on the badge. Avoid it detecting other than the black mark. eg. the badge laynard hole. This sensor should be adjusted to a position that able to detect the black line only.

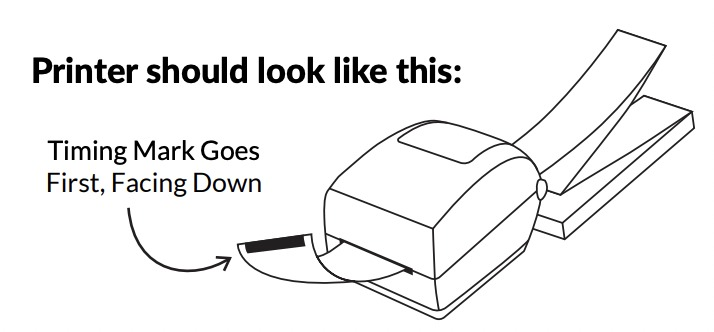
Load the badge stock. Insert your stock through the slot at the rear of the printer, feeding the edge with the black line into the printer slot first. The mark is read through a sensor on the bottom of your printer, so the black mark must be face-down with the blank or branded stock face-up
Expand the media guide's hangers so that they're the width of the badge stock. Then run the badge stock through between and underneath the media guide's hangers. Then close the printer.
Ensure the badge stock is put on the roller first before close the printer.
Supported Zebra Printers
- ZD620 (203dpi)
- ZD420 (203dpi)
Supported WiFi Frequency
- Only 2.4GHz is supported
Recommended WiFi Speed
Zebra Printer Configuration
- Make sure to have the correct configuration in Zebra printer. Locate the IP address of your Zebra Printer. You can obtain the IP address of the printer in 3 ways.
- From the Check-in App
- Locate the IP in the router client page. Login to your router, and you will able to see the IP address of your printer.
- Check the IP on the Printer Screen (Some Zebra Printer model don't have the Screen). This method only applied to the Printer that comes with Screen.
- After locate the IP address of your printer. You will able to directly goes to the Zebra Printer setting page via 192.168.8.138
The default login and password for the Zebra Printer.
username: admin
PW: 1234 - Make Sure the Status: READY. You need to ensure the status is Ready, so that the configuration can be apply to the printer.
- Make sure you selected
MEDIA TYPE: NON-CONTINUOUS
SENSOR TYPE: MARK
SENSOR METHOD: REFLECTIVE
After clicking the submit changes button, it will show "Changes were successfully saved (temporarily)". You still need to click Save Configuration in the next steps, to retain the configuation.
Make sure you Click the button "Save Current Configuration" to save the configuration to the printer. Otherwise, the printer will resumed back to the original setting.
Now, the configuration is saved successfully. Even you turn off and turn on the printer again, it will retain the setting.
Printer Calibration
- Calibrate the printer. The printer will be in pause mode. Press the Pause indicator button on the front of the printer to exit pause mode.
- Calibrate your printer by pressing and holding the Pause and Cancel buttons for 2 seconds. By calibrating, your printer reads the black mark on the underside of your badge to ensure that it knows the correct start and stop point of each badge. (You will only to do this step at the first time)
- Calibrate the printer. During calibration, your printer will go through a few badges in an attempt to read the black mark successfully. Check for a green indicator light to confirm that you're ready to print.
- Open the EventX Check-in app. On your iPad or tablet, tap EventX Check-in. To log in to the event, you will need to login your portal account on your desktop, and scan your event QR code under In-person Check-in > Tutorial. If you want to re-login, please scan again the event QR code for a data update.
NOTE: The EventX Check-in app allows you to use the same login credentials across multiple devices.
Download the attendee list. It will take some time to load the attendee list on the iPad or tablet that you'll be using for onsite check-in and badge printing.
Open the printer settings. Tap the printer icon in the top-right.
Configure the printer settings. Turn on the Badge Printing function, and wait for the device to locate your printer. Then tap the printer's name to connect.
Test print. After you have set up the printer and connected with the check-in app, check in the attendee by searching names, scanning QR codes, or registering a walk-in.
Printer Setup Video
Troubleshooting
1. Check if the badge paper is Timing Black Marks Goes First, Facing Down
2. 2 Badges Printed Out
Solution (2 Badges Printed Out)
3. Badge Auto Feed Position Not Correct
Solution (Badge Auto Feed Position Not Correct)
4. Incorrect Printing Positions
Solution (Incorrect Printing Positions)
5. Printer Is Not Working
Solution (Printer Is Not Working)
- After clicking the Reset Button, it will takes around 1 min to resume.
- Remember to select the correct setting afterward.
- MEDIA TYPE: NON-CONTINUOUS
- SENSOR TYPE: MARK
- SENSOR METHOD: REFLECTIVE
6. Network Lights Turn Red
Solution (Network Lights Turn Red)
- Turn printer OFF
- Hold PAUSE + CANCEL and turn the printer ON
- Hold down PAUSE + CANCEL until the status indicator is green.
Zebra Badge Guide
- Non-Adhesive
- Fanfold Stack of 500
- Direct Thermal – no ribbon required
- 1 Slot Punch (Die-cut hole)
- Paper thick: 230 GSM (g/m2)
- Badge Paper is for use with Zebra GK420t, ZD620
- Design area: 4” x 6”
- Name printing area: Suggested to have 7.5cm as the printing area, but can be sucjected to organizer's preference.
- Weight: 175 GSM
- Material: Thermal paper
- Badge type: Double sided
- Production lead time: 3-4 weeks
- No more than 5 different colors in the design
Related Articles
Zebra Badge Guide
You may order the Zebra Badge for your event. Double Sided Name Badges for Zebra Printer 4″ x 6″ Non-Adhesive Fanfold Stack of 500 Direct Thermal – no ribbon required 1 Slot Punch (Die-cut hole) Paper thick: 175 GSM (g/m2) Badge Paper is for use with ...Brother Printer Setup Guide
Video Guide For a video guide on hardware setup, please refer to this link. Supported Brother Printers Below are the Brother printer models that are supported for badge printing. QL-820NWB QL720NW QL-1110NWB (only supported for Check-in App on iOS ...Epson Badge Type
Introduction Epson printers are now supported for badge printing, allowing event organizers to print badges onsite using compatible Epson devices. This update expands printer compatibility and supports a more reliable onsite check-in workflow. Why ...Designing a name badge for check-in
In order to have the namebadges printed, organizers will first need to design the namebadge for attendees. Please refer to the video and article guides below for more information. Video Guide Please refer to this video guide on how to customize a ...Onsite Check-in
This article will summarize the necessary items to take note of when an event involves on-site check-in. Printer Setup Guide Brother Printer Setup Guide Zebra Printer Setup Guide Check-in App Video Guide To view a recording on the check-in app, ...