Attendee Management
Attendee List Features
Adding New Custom Fields
Video Guide
- To view a video recording on this, please refer to this video.
Article Guide
Organizers can add new fields on the attendee list by using the Manage Fields feature.
Step 1 : Under the Attendee List, click "Manage Fields"
Step 3: Select a custom field that you would like to add
- Short Text
- Long Text
- Single Choice
- Multiple Choice
- Dropdown
- Consent Text
Attendee Filtering
- In order to filter the attendees, click on the Status, Attendance, Roles, Tag or More Filters to view all exisitng filters.
- By clicking on the Status, Attendance, Roles or Tag filters, simply select the corresponding filter category that you would like to apply. The selected filters will be applied automatically once selected.
- If you would like to view all the filtering options, click on More Filters and all available filters will be viewable.
- This filters include:
- Blocked participant status
- Email marketing subscription
- Attendee status
- Attendance type
- Roles
- Tag
- Ticket class
- Registration form used
- Custom fields created on both the registration form and attendee list.
- Note:
- There are also the "OR" & "AND" wordings to indicate how the filtering system works. Items within the same filter category will be filtered based on the OR logic while items across different filter categories will use the AND logic.
- Once you have selected the appropriate filters under More Filters, click on Apply Filter.
Search & Sort Attendees
Searching An Attendee
- Click on the search bar > Type the attendee details such as name or email > Click on the search icon.
- The attendees will appear once the search icon is clicked.
- To view the entire attendee list again, simply click on the "x" button to cancel the search.
Sorting Attendees
- Click on the sort icon.
- Select the sorting method.
- The attendee list can be sorted by:
- Date & Time Created
- Name (based on alphabetical order)
- Registered Time
- Email
- Ascending or Descending order
Column Management On Attendee List
- Organizers can manage the columns that they would like to show on the attendee list. Firstly, click on the column icon.
- To exclude a column from the attendee list, simply toggle off the toggles highlighted in red. To reorder the column arrangement, use the icon highlighted in green to drag and drop.
- To reset the attendee list to display the default column settings, click Reset Columns.
Edit Attendee Details
- Under the attendee list page, hover over the right side of the attendee row and click the edit icon.
- Update the attendee information and click Update.
Removing Attendees
Video Guide
- For a video recording on this feature, refer to this link.
Article Guide
Organizers can remove attendees under both “Invited” and “Registered” Status. You can now easily manage your registrant data directly within the platform by exporting, editing, and re-importing the attendee lists.
Note:
- Attendees under "Attended" status with online or onsite check-in records cannot be removed.
To remove an attendee:
- Click on the icon as shown below.
- Click on the “Remove” option.
- Remarks
- Removed attendees are also included in registrant quota. To know more regarging the attendee quota calculation, simply refer to this article.
Bulk Update
Video Guide
- For a video recording on this feature, please refer to this video.
Article Guide
We fully understand the importance of efficiently managing attendee information. To simplify this process, we are excited to introduce a new feature that allows event organizers to update attendee information in bulk using CSV templates. This feature will save you time and effort by enabling you to make changes to attendee details offline and then seamlessly upload the revised file to our platform.
- Time-Saving: Updating attendee information individually can be time-consuming, especially for events with a large number of attendees. With the bulk CSV upload feature, you can make updates to multiple attendee records simultaneously, significantly reducing the time and effort required.
- Error Prevention: Following the headers in the template ensures that the updated CSV file aligns with the required format. This helps prevent errors and ensures that the information is accurately updated in the system.
- Seamless Integration: The feature supports all types of attendee fields, and various types of fields, including Single Choice, Multiple Choice, and Dropdown. When updating choice type fields, the existing options will be mapped automatically, ensuring consistency and accuracy in attendee information.
To update attendee information using the bulk CSV upload feature, follow these steps:
1. Download the CSV Template: Click the Attendee page, then click Bulk update, you will find the first step to Download the CSV Template.
2. Edit the attendee list in the CSV file. With this template, you can manage and update the attendee information.
Note: Do not revise the file Header and the first Row. However, you can always remove the other irrelevant columns if you do not have information to be updated.
3. Upload the CSV file. After you have uploaded the attendee list, the platform will help validate the Header Row and the attendee ID to see if those header & ID match the correct date of the system.
- If the file is ready to import, simply click on Confirm.
- If there are failed records, you can click on Download Fail Record to view the reason of failure. You may refer to this article on downloading fail records and corresponding failed reasons.
Note: Supported fields when bulk updating:
| Basic fields | Custom fields |
|
|
Note:
- Bulk update for email address is only available for In-person events.
- No limitation on the field number
- Import 1,000 attendees at a time, if you need to update more than 1000 attendees' info, please upload the CSV file separately
- File size should be within 20MB
- Text type field (short text / long text): no characters limitation
- Consent field (consent text): only the content with "yes" will map to yes, otherwise map to "fail"
- eg. if input "YES" / "yes" / "Yes" will map to "yes"
- eg. if input "no" / "n" / "yess" or any other characters that do not strictly match "yes" will map to "no"
- Selection type field (single choice / multiple choice/ dropdown):
- the content should map to the existing options
- for multiple choices, use ";" as a delimiter
- options uploaded are mapped by options ID, which supports i18n if the translations of the options are set up on the platform.
- EventX 2.0 also supports scanning 3rd party QR codes, you can import 3rd party attendee QR code string (eg. Eventbrite attendee QR code, or internal attendee QR code, etc.) to EventX platform, then our Check-in App 2.0 can scan and identify that attendee. Detail in https://help.eventx.io/portal/en/kb/articles/custom-qr-code-for-check-in
With the new bulk CSV upload feature, updating attendee information has never been easier. By leveraging this functionality, you can save time, work offline, and ensure data accuracy. Enjoy the convenience of managing attendee details in bulk, making your event organization pro cess more efficient and seamless.
Exporting Attendee List
To keep a record of all the participants who attended your event, you may now export the attendee list anytime from the Organizer portal. This feature is available on Enterprise plan.
To export the attendee data:
Step 1: Log in to your account at portal.eventx.io using your organizer login details.
Step 2: Once logged in, click on Attendee tab.
Step 3: You may filter a group of attendees to export or just export all attendees by clicking the export button. After clicking on the Export button, select the type of report that you would like to export.
- Organizers are able to export:
- Export to Salesforce (Deprecated)
- Attendee List Report
- Check-in/Out Report
- The exported file will be in CSV format
- Organizers are also able to export the attendee list based on the selected attendance method.
- The exported attendee list report data includes attendee details such as:
- Name
- Email
- Status
- Attendee type
- Magic Links
- Role tags
- Created at, Attended at, Registered at
- Registration form used
- Ticket class
- Registration questions
- Custom field questions
- Check-in method (if there is check-in)
- Check-in QR Code link (if there is check-in)
- Survey questions (if the post-event survey is toggled on)
- You may export up to 5000 rows of data per export.
- The exported check-in/out report data will include details such as:
- Name
- Email
- Check-in Date & Time
- Check-out Date & Time
- Undo last check-in time
Blocking Attendees
- Select the attendee that will be blocked.
- Click on the block icon > Click Long Press To Block
- Once the attendee is been blocked successfully, there will be an icon to indicate the block.
- On the attendee view, there will be a message that informs the attendee that they have been blocked from entering the event.
- To unblock an attendee, simply select the blocked attendee, click on the unblock icon and click Long Press To Unblock.
Attendee Status
There are 3 types of attendee status. Here are the definitions for organizers to understand the differences better.
Invited
- Definition - Attendees will be under Invited status when they have been invited into the event by the organizer to go through registration.
- Reminder
- For invited status attendees, the attendee would have to fill up the registration form.
- A magic link will be generated for the attendee once they have been imported by the organizer. This magic link will direct the attendee to the event site to register.
Registered
- Definition - Attendees are classified under Registered status when they have either submitted the registration form or they have been imported by the organizer to skip registration.
- Reminder
- The attendees under Registered status will receive a magic link once the organizer sends out the automated confirmation email when performing the import. Organizers are also able to copy the attendee magic link by click on the icon below.
- Attendees under Registered status do not need to fill up the registration form again.
Attended
- Definition - The status of an attendee will be Attended when they have joined or logged in to the event.
- Reminder
- Once an attende has joined or logged in, the attendee analytics will start to be recorded.
Attendee Magic Link
Attending the event with a magic link allows attendees to enter the event directly without a password sign-up but by just clicking a unique link from the provided email.
Important Reminder
- The magic link will be automatically generated for attendees that
- Have gone through registration and submitted the registration form.
- Have been added by the organizer through the Add attendees directly to the event (to skip registration)
Attendees can only enter the event 15 minutes before the event starts.
- Attendees may join the event using the magic link or logging in with their EventX account at portal.eventx.io
- Attendees may also click "Email me a login Link" to join the event.
- If attendees couldn't find the confirmation email, please retrieve the magic link from the event landing page by clicking on Email me a login link or the organizer can ontain the magic link in the portal -> attendee list page
NOTE:
- The Magic Link will not be automatically generated for special roles (eg. Event manager, speaker, host) and attendees that register through the walk-in form (if it is an in-person event).
- The magic link will not be generated for duplicated attendee emails
To use the Magic link feature effectively, follow these steps:
Step 1: Go to the Attendee list Tab and click +Invite Attendees Button --> Add attendee directly to the event --> bulk import / add an attendee
Step 2: An email with the Subject: Congratulations! You have successfully registered for.... will be received by the attendee.
Attendees can click on the Action button to Join the event
Step 3: After clicking Enter Event attendee will be directed to the event site.
Attendee Tag
Tags serve as a useful method to denote guests with extra details, such as why they're attending the event or their dietary requirements. They provide a convenient way to categorize and mark guests who share particular qualities.
Benefits
There are several benefits to adding tags to attendees in an event:
1. Improved segmentation and filtering. Tags make it easy to segment and filter attendees by their interests or attributes. For example, you can easily retrieve a list of all VIP attendees or students or those interested in a particular talk topic. This allows for more targeted communication and follow up.
2. Better personalization. Knowing an attendee's tags and interests allows you to personalize their experience. You might promote certain sessions or activities you think they would enjoy based on their tags. Or customize their swag bag with items tailored to their interests.
Create/Remove tag for an attendee
- To create a tag, go to Attendee List, select the attendees by clicking on the checkbox and click Tag Action.
- Input the name of the tag and click Create and click Save.
Note: The tag name cannot be edited. - To remove a tag from an attendee, select the attendee, click on Tag Action and uncheck the checkbox.
Send Manual Emails To A Group Of Attendees By Tag
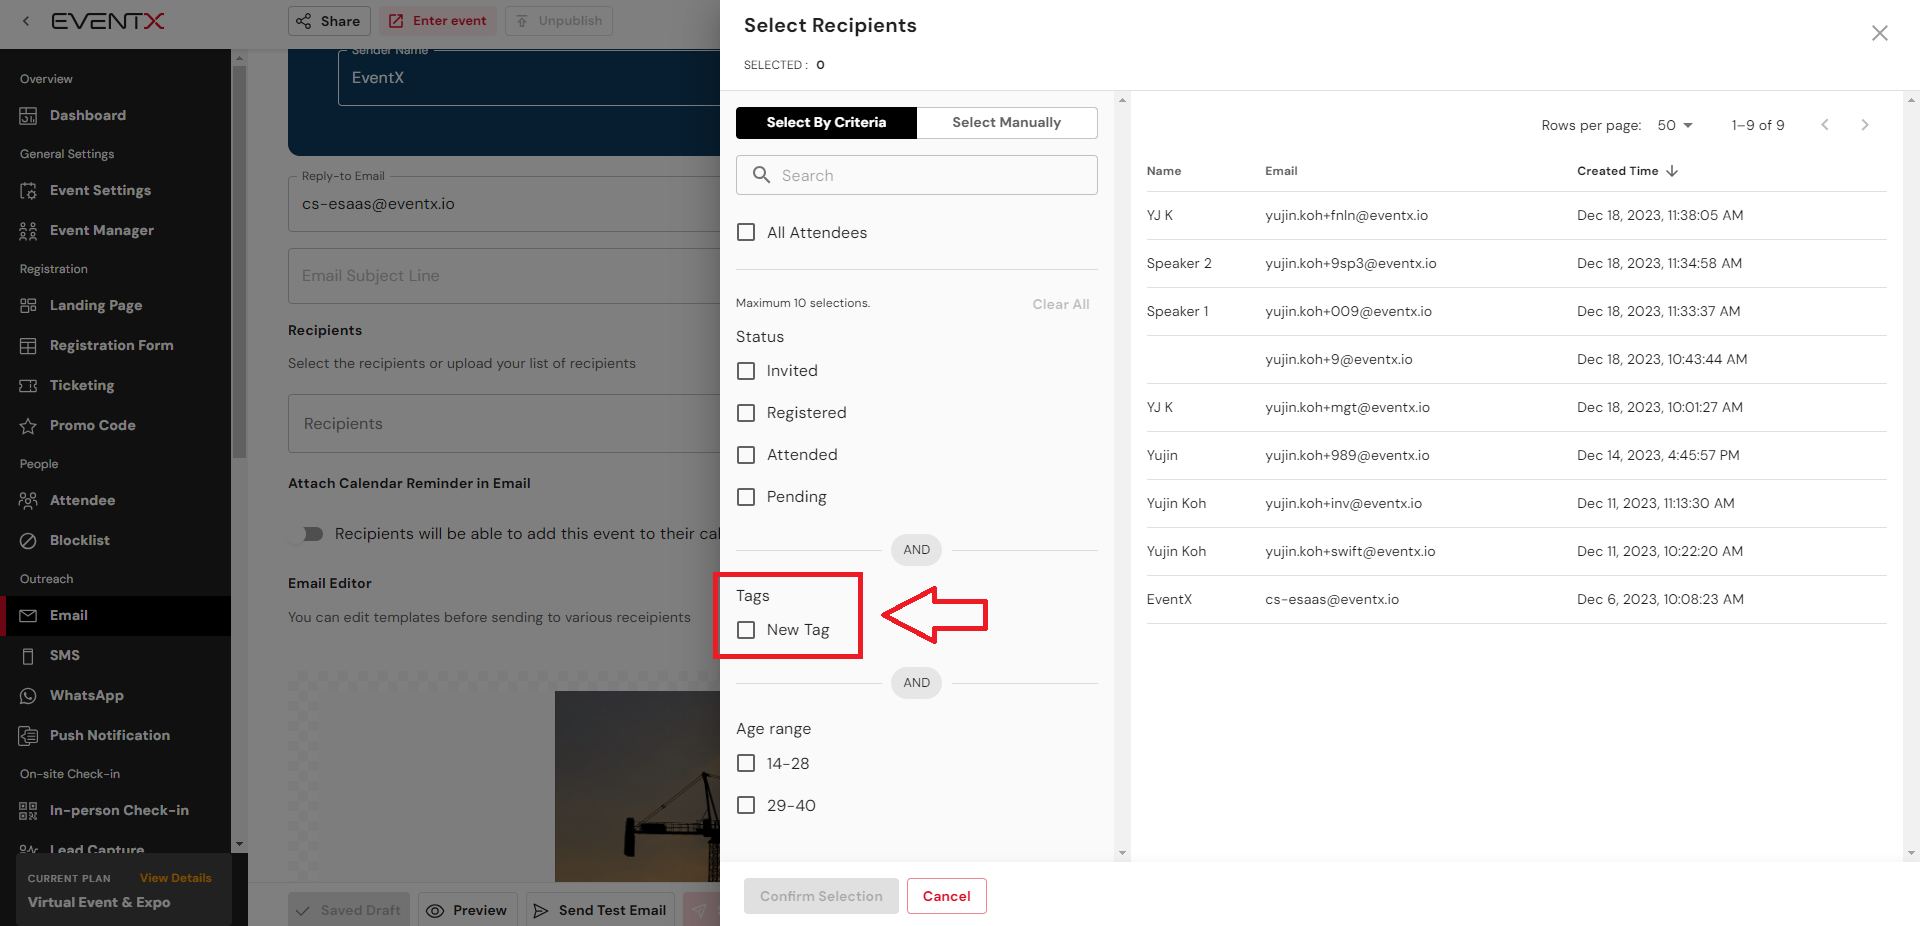
- Create email segments based on important tags. For example, set up segments for:
- VIP attendees: Contains all attendees tagged as "VIP" or "Executive"
- Students: Contains all attendees tagged as "Student"
- For more information on how to send manual emails, please refer to this article.
Downloading Failed Records
Use Case:
- When organizer imports a new batch of attendees or bulk updates the current attendee list, there will be an error message that alerts the organizer that there are a certain number of attendees that are invalid.
- For Bulk Importing Attendees
- For Bulk Update
- To view the reason that the attendee is invalid, click "Download Fail Record".
- Once the CSV file is downloaded, scroll to the right to view the column labelled as "failedReason". Organizers will be able to view the reason under this column.
List of Failed Reasons
For Bulk Update:
- ATTENDEE_ID_INVALID - Invalid attendee ID
- EMAIL_INVALID - Invalid email address
- UNKNOWN_FIELD_ID - Related to wrong custom field ID in the CSV File header
- RADIO_GROUP_OPTION_NOT_FOUND - Related to invalid input for single choice field
- DROPDOWN_OPTION_NOT_FOUND - Related to invalid input for dropdown field
- CHECKBOX_GROUP_OPTION_NOT_FOUND - Related to invalid input for consent text field
- TICKET_CLASS_NOT_FOUND - Related to invalid ticket class name
For Bulk Import:
- EMAIL_MISSING - The email field is blank. (Only applies for non in-person events)
- EMAIL_INVALID - Invalid email address
- UNKNOWN_FIELD_ID - Related to wrong custom field ID in the CSV File header
- RADIO_GROUP_OPTION_NOT_FOUND - Related to invalid input for single choice field
- DROPDOWN_OPTION_NOT_FOUND - Related to invalid input for dropdown field
- CHECKBOX_GROUP_OPTION_NOT_FOUND - Related to invalid input for consent text field
Attendee Approval
Video Guide
- To view a video recording on this feature, please refer to this video.
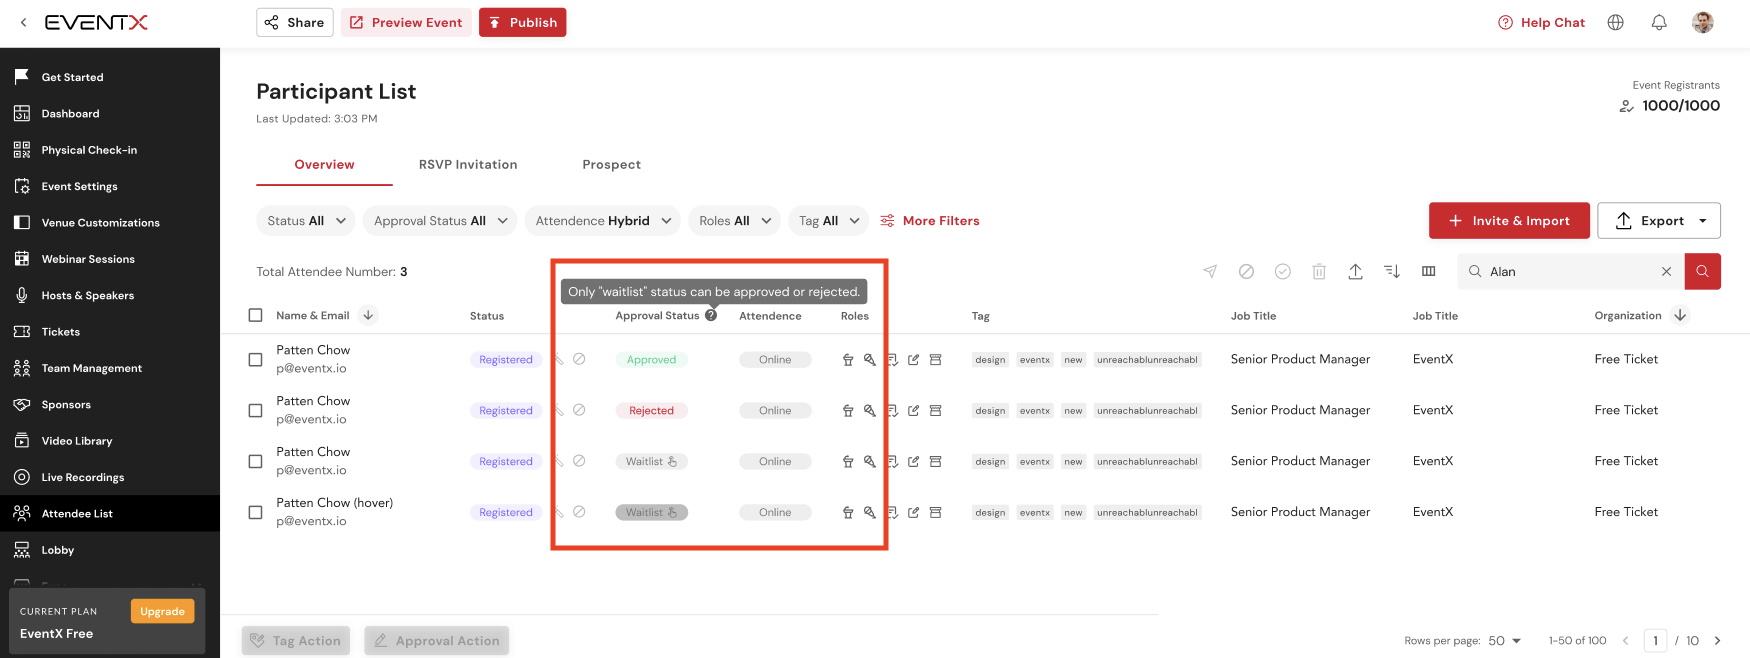
How organisers can view the registration inside the portal?
After a registration received, our platform will capture waitlisted attendees and hold their registrations for review. Organizers can then selectively approve or reject waitlist attendees based on criteria like seniority, company size, or other attributes that impact potential value. The approval process will boost event impact and budget efficiency.
How organisers can approve/ reject registrations?
Method 1: Single Approval
Step 2. Click "approve" or "reject"
Step 3. Confirm

Method 2: Bulk Approval
Step 2. Click "Approval Action"
Step 4. Confirm

Attendee flow after registration
- Fill in registration form
- Receive acknowledgement email after successful registration
- Acknowledgement email template is as below:
- Receive confirmation via email after being approved by organiser. If WhatsApp and/or SMS features are toggled ON for the event, the confirmation and reminder messages will be sent to the approved attendees.
- Confirmation Email
- WhatsApp confirmation message template sample (uneditable)
- WhatsApp reminder message template sample (uneditable)
Note: The 1 hour and 24 hour reminder message share the same template - SMS confirmation message template (uneditable)
- SMS reminder message template (uneditable)
- If your registration has been rejected by the organizer, the organizer will need to send you an email manually to notify you about the rejection. There are no automated emails to notify attendees who have been rejected.
How to edit the acknowledgement email template?
Remarks/ Limitation:
- Only apply to in-person event.
- Once this feature is enabled, it will apply to all registrations (except "add attendee to event")
- Only registered and waitlisted status attendees can be approved or rejected. You are unable to approve an attendee under Invited status.
- Confirmation email will be automatically triggered after organiser approves an attendee. If WhatsApp and/or SMS communication methods are toggled on, the approved attendees will also receive the confirmation and reminder messages via the respective methods.
- Organiser will need to send the reject email using the manual email flow once they have rejected a registrant.
Attendee Portal
Use Case
- Attendees that would like to edit their information after registering.
- Events that involve multiple ticket purchases per registrant. Once the purchaser assigns a ticket to a separate email address, the corresponding attendee will be able to change their details on their end using the Attendee Portal feature.
Steps To Enable The Feature (For Organizers)
- Toggle ON Enable Attendee Registration Editing on the Registration Form page.
Steps To Edit Details (For Attendees)
If The Event Has Not Started
- Click on the Enter Event button in the confirmation email.
- When directed to the event landing page, click on My Registration.
- Edit your personal details and click Save.
If The Event Has Started
- Click on the Enter Event button in the confirmation email as mentioned in step 1 above.
- Once you are directed into the event site, click on Settings > Registration Details.
- Edit your personal details and click Save.
Attendee Quota & Pax Calculation

In the attendee list, there are a number of figures that give us different information. The definitions of the numbers highlighted are:
- Total Number - Total number of records that are shown on the attendee list. This might be affected by various filters if any filters are applied. Be sure to check if any filters are being utilized to make sure that the numbers shown are accurate.
- Note:
- If there are any attendees that have been removed, they will no longer be shown on the attendee list.
- Once an attendee is removed, the attendee check-in QR Code will become invalid. This logic applies even if the organizer re-imports the attendee with the same email address and resends the confirmation email.
- If you would like to view the Registered Attendees that are stated under the Event Registrants breakdown, simply use the filters below:
- Under Status, select Registered and Attended
- Under Role, select Attendee
- Note:
- Event Registrants - The total number of registered visitors for the event. This includes attendees that have been removed from the attendee list. To view the breakdown of the number of event registrants, simply hover over the number.
- Note: Event managers and special roles (hosts, speakers, booth exhibitors & booth representatives) are not counted in the event registrant quota.
- Organization Quotas Remained - The difference between the Max Number of Total Event Registrants in Organization and the total number of registered visitors of all events within the organization.
Use Cases & FAQ
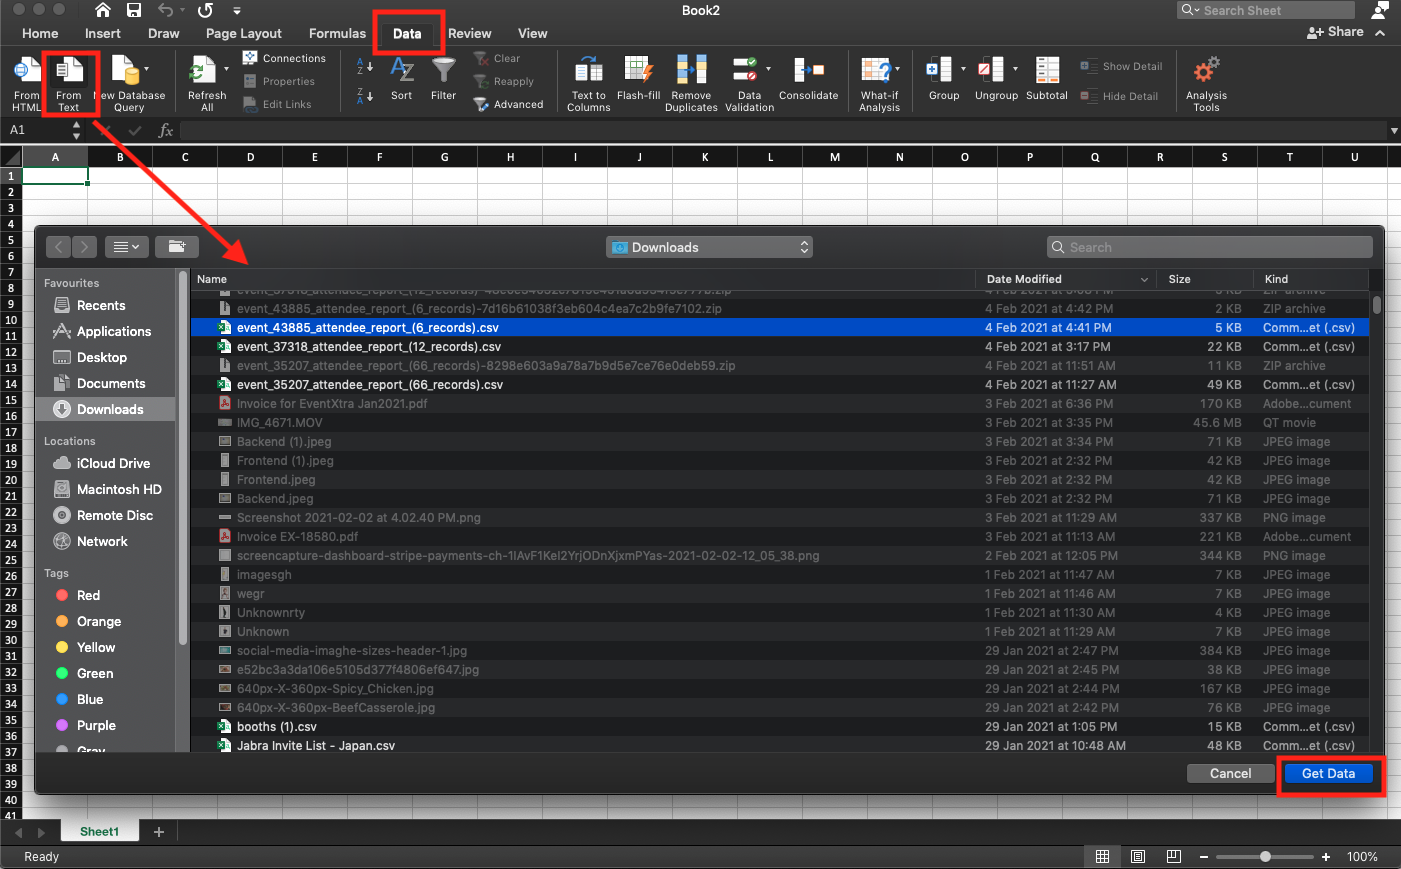
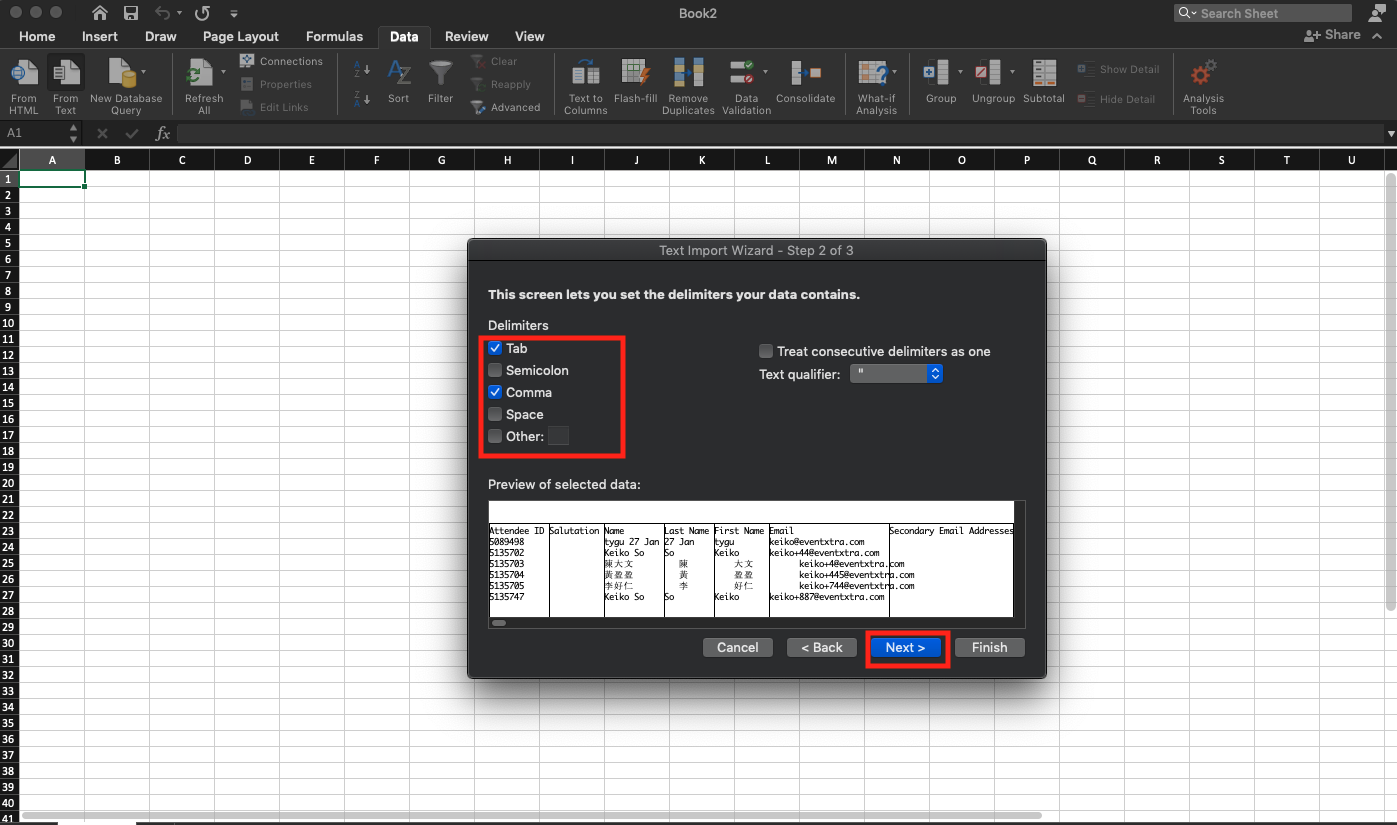
Attendee report CSV file shows unreadable symbols, how to display the correct characters in the file?
When trying to open a CSV from exporting attendee list with Asian (Japanese, Chinese, Korean etc) words, the characters are replaced with unreadable symbols in opened up excel files. Follow these steps to open the export in Excel to correctly display the Asian characters.


Integration of EventX with 1000+ Apps with Webhook
With the newly launched function, you are able to connect EventX with the solutions you use everyday to drive efficiency and achieve your business goals.
What are the use cases of integration?
- Add event attendees information to your mailing software
- Manage your customer relationship data on Salesforces (Deprecated)
- Engage your attendees with CRM tools, eg. Drupal
How to Proceed?
Step 1. Let us know the actions you would like to trigger, attendee update on create, update, delete of basic fields including:
userID, name, email, status, attendance type, ticket, job title, organisation, city, country, contact number, source, area code, created time, update time, attended time, registered time, checkin time.
& Custom fields such as organizer enable reg-form and add some custom fields.
Step 2. Provide us the webhook url so that you are able to connect to your solutions.
Remarks:
This feature is currently available in enterprise plan, please contact your CS support to have a try!
Changing RSVP Attendee's Email Address
- The user cannot change their own email address on the registration form as the email address is pre-filled. Instead, the attendee can contact the organizer to do so.
Note: The email address of the attendee can only be changed for In-person events.
Steps For Organizer
- To change the email address of the attendee (RSVP or regular attendee), go to the Attendee List.
- Search for the attendee by using the search bar or click on More Filters and select RSVP under Invitation Flow.
- Click on the pencil icon to edit the attendee details.
- Edit the email address and click Update once done.
Related Articles
Advanced Attendee Importing and Bulk Update
Attendee Importing The New Attendee Importing will be live and effective for all users after Aug 6, 2024. Our import tool helps you add or update attendee contacts in EventX. Import from upload a comma-separated value file (CSV) like Microsoft Excel ...Exporting Attendee List Report
To keep a record of all the participants who attended your event, you may now export the attendee list anytime from the Organizer portal. This feature is available on Enterprise plan. To export the attendee list report: Step 1: Log in to your account ...Attendee Importing
RSVP Invitation Video Guide For a video recording on this feature, please refer to this link. Article Guide Wondering if your invited participant is interested to attend your event or not? Worry no more because the RSVP invitation function would ...Bulk Update on Attendee Fields
We fully understand the importance of efficiently managing attendee information. To simplify this process, we are excited to introduce a new feature that allows event organizers to update attendee information in bulk using CSV templates. This feature ...People List
Adding New Custom Fields If an organizer would like to add a new custom field into the attendee list, it can be done by clicking on the Manage Fields button under the Attendee List. Please refer to this article for detailed steps on how to add a new ...